|
Saralee’s New Rudder |

|
| By Craig Gleason - Shalimar,
Florida - USA |
For some time I have
been dissatisfied with the stock rudder specified
for my Stevenson Vacationer. It seemed to require
too much effort to control the boat. Weather helm
it is called and it refers to the tendency of the
boat to want to turn up into brisk winds unless heavy
pressure is maintained on the helm. With wheel steering
this is a double pain as the mechanical advantage
of the tiller bar is not there and wheels are a bit
more tiring to hold. Looking around for a “better
way” my search led me to NACA Foils. They are
hydrodynamic structures used for keels and rudders.
They are shaped much like aircraft wings and provide
lift due to the water flowing over the curved surface
of the foil just as moving air does with airplane
wings. Where aircraft wings are normally single sided;
that is rounded on top and flatter on the bottom,
rudder foils are double sided with each side providing
lift as it is turned to face the flow of water when
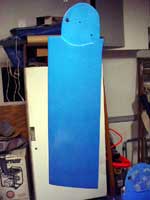
turning the boat. Photo 1 shows the
overall shape of the foil. This contour continues
from the bottom of the blade up to the rudder box.
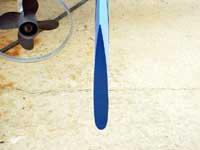 |
Photo
1, Rudder profile for a #12, low velocity
foil.
(click
images to enlarge) |
|
I couldn’t seem to center the
profile in the viewfinder so that it didn’t
look bent. The cord, the fore and aft width of the
blade, tapers to a bit more than 1/8th inch. This
should be closer to ¼” but it just sort
of worked out this way.
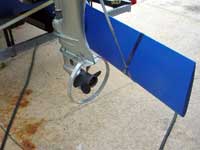
The metal ring around the prop is a rudder guard.
With the rudder in the up position and tightly turning
to port, the rudder will come into contact with the
prop blades unless the motor moves with the helm.
This boat is too small for that kind of automatic
protection so the guard saves the rudder and reminds
me to turn the motor tiller a bit if a tighter turn
is needed. I fixed the gouges in the old rudder a
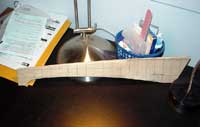
dozen times or more. Photo 2 shows
the rudder guard to be a ¼ x 1” aluminum
bar formed around a 2 gallon metal milk pail and bolted
to the cavitation plate. There are other ways to attach
something like this so look around on the Net for
other ideas. I like this style as it also alerts me
before the prop is running in the sand. The strap
is a fail safe to keep the rudder from falling if
I leave the nut off the rudder storage pin,,,, again.
| Photo 2, Home
made prop guard. |
|
|
My new rudder is larger than that specified by the
Stevenson’s drawings for the Vacationer. Balanced
rudders are normally used to counteract weather helm.
While the lead ballast at the foot of Saralee’s
mast helped trim out some of the excessive rudder
pressure, heavy winds always brought it back with
a vengeance. Some degree of weather helm is desired
as a safety feature. A boat with weather helm will
automatically turn into the wind and stop sailing
if the rudder is released. This is a very good thing
to have happen if you or another falls overboard.
A balanced rudder is made by moving some of the effective
surface ahead of the rudder pivot point. In the case
of the Stevenson rudder designs any addition to the
front of the rudder adds balance and reduces weather
helm. This modification is applicable to any boat
experiencing excessive weather helm or poor rudder
performance.
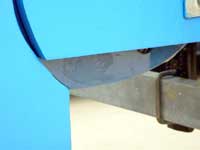
Photo 3 shows the stock rudder with
Lexan shims. The blade is constructed “as drawn”
and the Lexan shims out the blade to rudder box play
reducing the strain on the pivot bolt and keeps the
blade plumb in the box. That fine looking white adhesive
is 3M 4200.
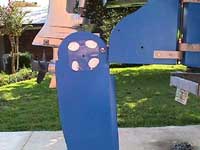 |
Photo
3, Stock Rudder Blade |
|
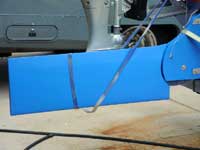
Photos 3 and 4
show the relative difference in size between the stock
rudder and the new foil. The rudder head is made “as
drawn” to fit the existing rudder box; however,
the box requires minor modification. The new blade
is 14” wide with 3 inches more material on the
leading edge of the blade. This brings the front edge
below the pivot bolt seen above and about an inch
under the keel. Paul Riccelli estimates this to be
a 20% increase in balance over the old rudder. He
cautions that percentages over 15 may cause poor control
at slower speeds At it’s thickest the new blade
is just short of twice as wide as the old blade so
allowance for the rudder box clearance must be made.
Photo 4 below shows the new blade
ready to mount and test.
| Photo 4, Finished
Foil Rudder |
|
|
The NACA 0012 foil makes a very efficient low speed
rudder and was recommended to me by Paul, Barry Payette,
and some of the builders on the Trailer
Sailors Board. These foils are not hard
to make and provide a really cost effective performance
enhancement for any of our boats. I started by downloading
the shareware program NACA Generator. This easy to
use program will ask you for the general parameters
of your new rudder and generate a set of scaled points
that define the contour of the blade. Just like laying
out a keel or other large components the coordinates
were transferred to a piece of thin stock that was
previously marked with a 1” grid. The points
were connected using a thin batten and the template
rough cut on a band saw. The finish work to smooth
the template was done with a file and sandpaper. Try
to be exact but don’t worry about small variations.
Photo 5 shows my template. It is
actually longer than the blade on the after part to
make it easier to hold while checking the work. You
can measure and mark at the same time.
 |
Photo
5, Foil Template |
|
I am sorry that I didn’t take any progress
photos. I didn’t imagine I would be writing
this article so just bear with me on the construction
details.
Charlie Jones, a professional boat builder from the
Trailer Sailor group recommended building my rudder
as high aspect (longer for more control surface),
and to leave the bottom squared as opposed to rounded..
At 6 or 7 knots the squared tip really doesn’t
add any significant drag. Armed with the advice and
counsel of my friends I went to Lowe’s for wood.
Now normally I would get good Douglass Fir at a real
lumber yard; but this project required one 16”
and two 12” planks. Using fir, that gets real
pricey real fast. Lowe’s had some very clear
white pine 6’ shelving lumber that I had noticed
previously so that was my material choice. I was even
able to find three very clear quarter sawn pieces.
The 16” plank was ripped to 14“and all
three trimmed to rough length. The 12” pieces
were epoxied to the larger center board to build up
the required thickness. Remember the rudder head is
just above the trailing edge of the blade on the Stevenson
boats and the 12” boards are flushed up to the
front. When everything was cured the fun began.
The extra thickness of the foil must be accommodated
by both the rudder and the rudder box. Photo
6 shows how a rounded relief is machined
onto the rudder cheeks. The aft end of the rudder
box must be ground down to allow the cheeks to pass
as the rudder is rotated up and down. The best way
to get this right the first time is to locate and
drill the pivot hole in the rudder head and use the
pivot bolt to hold the rudder in position so you can
mark the arc that the bottom of the rudder box will
require to allow rotation. Use the “as drawn”
locations for the holes in the rudder head to insure
the rudder box stops are still correct. Use small
wood shims if the stops need adjustment. Relieve the
blade and grind the box to allow free movement. Removing
the rudder box to the shop will expedite this process.
The preceding described work is best done before you
start the contouring process to save wear and tear
on the finished surfaces. Now is the time to find
the required thickness of the Lexan if required. Lexan
is easily worked and will not become brittle in sunlight
like plexi-glass.. With all this done it is time to
shape the foil.
| Photo 6, Foil
and Rudder box with Lexan shims |
|
|
Now Oyster would take his magic grinder to this and
have it done in a jiffy; but, I like planes. Always
have. There are other tools that will suffice and
some are much faster to use; however, the feel, smell,
and sound of newly planed wood is emotional for me.
So out came the planes and I started rough shaping
the nose of the foil. Working from nose to trailing
edge I shaped the contour of the foil with my planes,
finish sanders, and yes, finally the right angle grinder.
Work slowly and check your contour with the template
often. I marked the high spots with a pencil and used
a bloc plane or the sander to work them down. As you
near the trailing edge you will find that the 12”
boards do not completely fair to the trailing edge.
I filled the small (- ¼”) step with epoxy
and fairing compound. Using 80 grit sandpaper I broke
all the sharp edges and gave it all a once over. Next
I applied a seal coat of epoxy followed with 6oz glass
and more epoxy. I used three good topcoats of resin
and then epoxy fairing compound as required. Continue
to check with the template here as you can change
the contour while fairing and sanding. Small imperfections
are what glazing putty is made for. Get it at your
local body shop supply house. After a light sanding,
a primer coat of Kills. It preceded the blue
latex top coats. I use latex on the hull as she is
trailer sailed and the latex will touch up with no
tell-tale marks and lasts for years with little maintenance.
Latex is a poor choice for the topsides as it tends
to stay a bit soft and white takes stains easily.
Photo 7 shows the completed rudder.
 |
Photo
7, The finished rudder and rudder box
modification. |
|
I have only had the boat out once since making the
new foil so I don’t have a lot of test data
or performance analysis to share. I can say that in
10 knot and less winds she handles like a dream. The
excessive weather helm has been reduced greatly at
these wind speeds and low wind speed performance did
not seem to suffer. Tacking seems much easier now.
For any given steering action the required rudder
deflection has been greatly reduced. A friend gave
me a wind
speed indicator today so now I can make
accurate wind speed measurements. This will help generate
accurate performance data as opposed to the by guess
and by gosh methods. Still, I will be out on the water
enjoying my new rudder so don’t expect a full
blown technical report! Happy building.

More Articles by Craig
Gleason:
|