I recently picked up a old Johnson 3hp, rebuilt the carb and got it running good in the
test tub, but wanted to get it out on a boat this fall and test it on the water.
The only boat I have is my 17' cedar strip canoe with about a 32" beam. I went looking for a motor mount and what I found, of course, was that the only ones built to carry
anything more then a little electric cost $60-$110 bucks.
I'm looking at these things wondering how the heck they can get that much for
them, and also thinking there's no way I'm paying that much! I am a selective cheap–skate …and my cheap gene was kicking in.
After looking at a couple of styles (my neighbor has one he bought and I looked on the web) I had a pretty good idea of how I could build one that would suit my needs.
With about an hour’s worth of work - and $2 worth of wing nuts/washers (I had
the rest of the materials lying around) I built a motor mount – ok, not pretty yet, but
put together enough that I could try it out and see how this would work.
I was a little worried about hanging 38lbs off the side of this fairly narrow
canoe, but I got out on the local river with my niece as ballast (she’s an adult – she knew the risks!) and it worked great. The mount stayed in place and solid and the motor ran like a champ. We sat in the bottom of the canoe to keep the balance low and really didn't feel uncomfortable at all.
The only bit of excitement was figuring out where that extra (very cold) water
that was soaking my butt was coming from!! I first I thought I must have leak in the
boat (not good) - but after watching what was going on behind me when the motor was
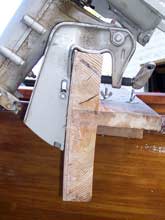
running, I realized that water was splashing off the motor shaft and into the boat behind the mount.
 |
You can see in this picture the area I’m talking about.
click images for larger views |
I’m figuring that with a small piece of ply and some wood banding, I can put together a temporary removable deck that will cover the area behind the mount and keep the water out. It will also keep the mount from inadvertently sliding backwards if things loosen up at all.
I still need to finish it, so it’s going into the pile of winter projects that are collecting in my basement.
For the cross member that mounts to the top edge of the gunwales, I used a 1x6 hunk of hardwood (ash I think??) long enough to span the beam of the boat behind the rear seat of the canoe (The extra length sticking out the port side has since been trimmed off).
Before I cut pieces for the transom, I checked the outboard to determine the minimum width and height needed to fully support my motor – and then added a couple inches to each.
I ended up with a 8” x 8” transom mount and used 2” doug fir.
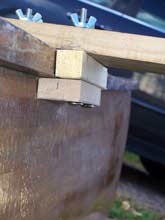
Since the transom is split between the top and bottom of the cross member (see the picture below), I needed to determine how much should be above the cross member, and how much below. I wanted the motor to mount as low as possible, to keep the center of gravity low and to make sure that the prop was in the water! I measured how far down the forward edge of the motor mount clamp sits on the transom, – In my case – 3”, then cut 3 ½ inches off of my 8”x8” transom, gluing the smaller piece to the top and the larger to the bottom.
 |
The top and bottom pieces glued together. |
After gluing the top and bottom pieces onto the crossmember, with epoxy, I faced the back side with a piece of scrap 6mm marine ply, using Gorilla Glue and stainless screws to attach. That added a LOT of strength to the whole setup. I also filleted the joins between the transom pieces and the crossmember.
 |
The piece of 6mm scrap ply glued and screwed on added a LOT of strength. |
Once I had the transom glued up on the crossmember, I set it across the beam of the canoe where I wanted to mount it, and ran a pencil along the inside and outside of the gunwale edge, to determine where I’d set up my cleats. I then measured the thickness of the gunwale (to determine depth of spacer) and distance from the outside edge of gunwale to hull to determine cleat size. Cut/test fit/ glue and drill a few holes and you’re almost there!
 |
I’m sure the cleats will vary for everyone. |
I built my canoe with solid inwales and gunwales so this cleat arrangement works well for me.
I had some stainless ¼” bolts and picked up washers, lock washers and wing nuts for a few bucks and was done with it.
Hey! I just saved enough to buy another sheet of Marine Ply!!

Tim Ingersoll |