|
I live in an area where there are dozens of ponds and lakes within
a half hour drive. My wife is not keen on having a trailer in
the yard, so consequently, I've got to be able to pick up any
boat I build and put it in the bed of my truck, or put it on a
truck rack. My boats have to be easy to build in that they don't
require expensive tools or a master craftsman's hand. I don't
care how long it takes. Other than fiberglass supplies, everything
in my boats comes from one of several home improvement stores
in the area. Since I glass everything, I use the cheapest materials
possible, which up to this point has been 1/4 inch underlayment
and pine trim.
 |
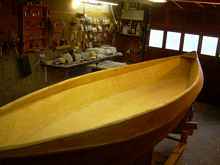
I am looking to replace a 14' pirogue (see above) my wife and
I have been using for the last five years or so. It only has about
7" freeboard when in the water, so I want something a little
more sea worthy. I also want to be able to attach electric motor
mounts to the boat; near the stern of the boat for those times
when my wife is with me, and on the bow of the boat for when I
want to fish by myself. So the new boat needs to be more robust
structurally than what I have.
After reading a post on another forum a while back about Great
Stuff, I decided to do some experiments using sandwich construction.
I produced three samples, each 2 inches wide and 18 inches long.
The first sample I produce using two strips of 1/8 doorskin separated
by 3/4 inch and filled with Great Stuff. I had to use some small
dowels to maintain the separation while injecting the Great Stuff.
The second sample was simply two strips of the same doorskin glued
to a 3/4 inch piece of Dow Styrofoam insulation using Elmer's
wood glue. The last sample was a strip of the Dow glassed on both
sides with 6 oz. cloth and epoxy. By far and away the doorskins
on the Dow were clearly superior in rigidity, and provided a surface
that would more readily take the weight of a person moving around
the boat. The glassed over Dow had some give to it when squeezed.
 |
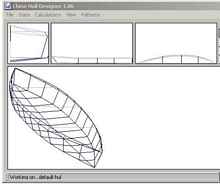
I used Hulls (Carlson Design) to design the inner hull. The
Hulls program allows you to arrange the parts onto a sheet(s)
of plywood in any fashion you want, then gives you a set of coordinates
on the sheet that you use to plot points along the lines of the
parts. The lines are drawn by using a long piece of pine molding
screwed down to the plywood along the points. I have used this
program to build a number of other boats. The program is not too
accurate in that it only generates six of seven points along the
length of an 8 foot piece of plywood for each line, leaving some
interpretation regarding where to place the molding between the
points. As a result, once the parts are cut out, the port and
starboard pieces have to be placed together side by side to assure
that they are exactly the same dimension, and if they are not,
one or the other has to be trimmed, leading to more inaccuracy.
You get the shape of the boat you designed when everything is
stitched together, but not exactly the dimensions you expected.
The program is free, so I can't complain.
 |
Because of the inherent inaccuracies of the design program,
I realized that I would be in for a multitude of problems if I
used it to design the outer hull as well. I thought it would be
much easier to plank the outer hull, making adjustments in the
individual planks as I went along, rather than trying to make
major adjustments in large pieces. Since the planking would be
glassed, I don't believe I gave up much strength using this method.
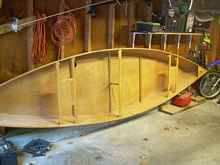
This boat would have to be turned several times during the course
of construction, so it had to be built on a frame. The frame had
to be as light as possible, so I constructed each section from
1/8 underlayment plywood, joining the sections together with two
inch strips of the same plywood. The Hulls program provided the
dimensions for three of the sections, but feeling that I needed
more for rigidity, I used CAD Standard (free) to calculate the
dimensions for four more sections. The sections were aligned by
drilling a 1/8 inch hole in each section on the centerline a fixed
distance from a line parallel to the bottom of the boat. I used
a laser ($2.99 at Walmart) to align the sections fore and aft
by shinning the beam through the holes, and a level for port and
starboard alignment. As each section came into alignment, it was
attached using the strips and hot glue.
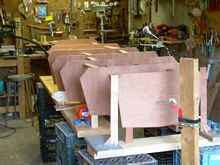 |
Once the frame was constructed, I used the Hulls program to
produce the parts for the inner hull. After I had these parts
cut out and matched, I used them as templates to trace out the
3/4 Styrofoam that would be placed over the inner hull. I staggered
the layout of the Styrofoam so that endpoints would not correspond
to endpoints on the parts of the inner hull.
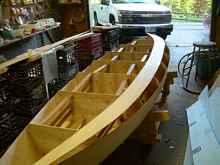
I used solid core copper wire from Radio Shack to stitch the inner
hull together. As anticipated, the hull did not exactly match
the frame, so I had to make adjustments in the frame to make a
rigid fit. I did this by hot gluing some spacers to the frame
in such a way so that they pushed up against the inner hull. I
screwed small eyelets into the hull and used wire and small bungees
to hold the hull against the frame, so that when turned upside
down, the hull wouldn't move out of the frame. Once everything
was secure, I applied an epoxy paste using flour as a thickener
to the seams, and once that cured I removed the copper wires by
heating them briefly with a propane torch and extracting them
with pliers.
 |
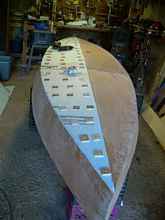
The hull was then turned over. I attached the Styrofoam by applying
Titebond II exterior glue to the hull, placing the Styrofoam on
the glue, and then screwing down the Styrofoam using 1 and 1/2
inch #8 hex head metal screws. I made my own fender washers out
of 2X2 inch pieces of 1/8 ply.
 |
Using this method produces a screw hole in the inner hull, which
later had to be sanded, filled, and sanded again before it is
glassed. For my next project I'm going to try the following method:
I'll drill 1/2 holes in the Styrofoam. I'll then place the Styrofoam
on the inner hull without glue. Into the holes I'll place a 2
inch piece of 1/4 in dowel by hot gluing it to the hull, but not
to the Styrofoam. Once all the holes have a piece of dowel, I'll
remove the Styrofoam, lay down the glue (the dowels remain glued
to the hull), and place the Styrofoam back over the dowels. I
think by using some of my fender washers and pinch-on clamps I
can produce the needed pressure for a good bond. Once the glue
sets I can just clip off or pull out the dowels.
A gap forms where the Styrofoam chines meet. On the bottom of
the boat this gap was filled with a 14 foot piece of pine 3/4
inch quarter round. Holes were drilling in the molding and it
was screwed to the inner hull. The holes were filled and the screw
tips were ground down flush with a Dremel where they protruded
the hull. That gap was nearly 90 degrees wide, so the quarter
round worked nicely. Where the upper two chines meet, the gap
is only about 45 degrees, so I had to fashion little six inch
triangular prisms out of a fir 2X4 using my table saw. The prisms
were glued in the gap with Titebond and epoxied end to end with
the aforementioned paste.
The rest is pretty straight forward. I attached some fir pieces
to the bow and stern to bolster strength there. I ripped the planks
out of 1/8 ply and staggered them in their placement to maximize
strength. They were screwed down with 3/4 inch #8 hex head metal
screws, which were removed after the Titebond set, and the holes
were filled with epoxy paste. The color of the plywood used is
a very red luan, so I added a little powdered tempera paint to
the paste in an attempt to match the color. Powdered tempera is
a great way to add pigments to epoxy, or to use as a water based
stain on wood before applying epoxy. I think it's about $3 for
an eight once jar that lasts forever. I get mine from Discount
School Supplies.
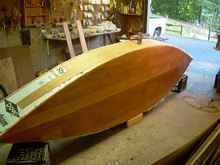 |
I covered the exposed Styrofoam where gunnels would normally
be with a set of fir rectangular prisms in the same way that I
filled the 45 degree chine gap, and sanded them round to cap off
the top of the boat. The boat is now fully glassed inside and
out. I am in the process of making the foredeck out of laminated
1/8 ply, along with the aft deck, which will be just big enough
to provide a handhold when carrying the boat, and as an attachment
point for lines. I still have to design the hangers for the seats
and thwart, and the fore and aft motor mounts.
Structurally, the boat does not need a thwart, but having a quick
detach thwart might aid in getting the boat up on the truck rack.
Email me if you want the .hul or the .dxf files, or anything else
at: r2pbrewer@yahoo.com

|