
 Custom Search
|
|
| sails |
| plans |
| epoxy |
| rope/line |
| hardware |
| canoe/Kayak |
| sailmaking |
| materials |
| models |
| media |
| tools |
| gear |
 |
 |
| join |
| home |
| indexes |
| classifieds |
| calendar |
| archives |
| about |
| links |
| Join Duckworks Get free newsletter Comment on articles CLICK HERE |
|
|
| Mounting Hatches on Curved Decks |
by Charles
Spano - Titusville, New Jersey - USA |
How to create an attractive flat mounting surface for a deckplate on a curved boat deck.
Don't know if you remember me. I wrote you last summer and complained that a hatch ring on my Night Heron cracked. You asked if I had made a flat hatch recess and I think I went over my entire process. You then asked if I had photos because some of your clients using your hatches were not making flat hatch recesses. I did not have pictures; by that point in construction I was so excited about finishing that I did not take pictures of the hatch fabrication. In any case, I just finished and Outer Island in which I will install your hatches. This time I did take pictures. My front hatch is a carbon recess with a 1/4" plywood base. The recess was laid up over a wood mold/form that I turned on my wood lathe. The back deck had about 3/8" arch so I had to make a recess for the back hatch also. It consists of a smaller ID plywood base ring (ID is the same as the plastic hatch ring seating ridge) which the plastic hatch ring will sit on (just like the front) and arcs of 1/4" plywood with an ID the same as the deck opening stacked up on the base ring and sanded to conform to the deck arch. Tiny gaps between glued-up ring assembly and the deck was filled with epoxy putty. Then it was all sanded fair to match the deck opening. A epoxy putty fillet was added to the base ring so glass and carbon would follow the shape nicely. Then a layer of carbon and a layer of glass to make it look like a carbon hatch recess lay-up. Then all was sanded fair. The reason I have described both recess assemblies is because I think the completely plywood, false carbon ring came out nicer and is perhaps easier to make. If I had to do a deeper recess like the front hatch recess again, I would make it like the back recess. I would go this route not because it is a little simpler, but because it leaves a very thin carbon edge that defines the recess from the deck. On the OI Jay outlines a wood ring, which I think requires a lot more precise work and finishing where the built-up plywood ring is made fair and perfect with a very little epoxy putty and a 1/2 hour of sanding and no fancy machines to make a mould. What really turned out nice this time was my carbon coaming, which I was able to do with much less resin, glass, and carbon then my previous carbon coamings because it laid up very fair. It weighs 0.75-0.80 lbs. it worked out like this because I used spray glue to adhere the minicell foam (that makes the mold/form) to the riser. Taping the foam to the riser typically pulls it up and down making an unfair surface. The spray glue lets it attach perfectly flat. The Front Hatch The front deck on the Outer Island has a fair amount of arch and requires a recess that is about 3/4" to 7/8". I chose to make this recess as a carbon lay-up. As I have done in the past, I made a wood mold/form on the lathe. I have seen some posts in which builders have hunted for a plastic bucket the correct size. In any case, I start off by turning a wood form, which looks like the outside of a wood bowl. In this case I used the form that I made for the Night Heron that I built last year. However, I used that form for the NH's rear deck and the front deck of the OI has a bit more arch, so I had to make the form higher. In the photo you will note that the form has a litter taper or what is know as draft. The recess also in the photo is waiting for a bit more work.
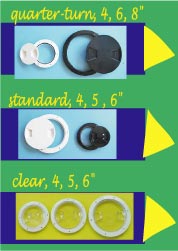
The Rear Hatch I am currently finishing up my Outer Island designed by Jay Babina. The pictures in this article are of the rear hatch recess. I am installing 10" "Tupper Ware" style hatches from Duckworks. While the rear deck is fairly flat on the Outer Island it is not flat enough to secure the plastic hatch ring typical of this style of hatch. To do so would only result in a cracked hatch ring that would also probably leak. The plastic hatch ring must sit on a dead flat surface, thus the need for a hatch recess even on a fairly flat deck.
First, the ring (that you can see in the photo below) is cut to size. The ring ID matches the Duckworks' plastic hatch ring locating lip. The plywood ring OD is about 1" or so larger than the opening in the deck. I like to glue (with 3M marine adhesive) and screw the plastic hatch rings to the top side of the deck. In the event of a mishap and it is ever necessary to replace the ring, it is just a matter of undoing the machine screws and nuts and carefully working and prying the ring until the glue releases.
If you place the plastic ring on the deck's top side the hole in the deck must be larger than the plastic ring flange OD. That explains why the ring in the picture is so wide. If the plastic ring were attached to the underside of deck, the deck hole would be much smaller and the wood ring OD would be the size of the pencil circle scribed on my ring. Enough of that aside. The wood ring is fitted to the deck by positioning it over the deck hole. As a result of the arch in the deck the wood ring rests on the deck at the sides of the deck and a vertical 1/4" gap almost a half arc at the front (behind the cockpit) and at the rear (looking toward the stern) must be filled under the ring. I did this with an arc cut from a ring that has an ID the same size or an 1/8" smaller the the deck hole and OD the size of the wood ring below. The arcs are positioned and indexed to the wood ring. They are then glued to the wood ring with epoxy and filler. Once the assembly has cured it is taken back to the deck fitted and sanded so it sits on the deck level and most of the gap is filled. Once it is fitted as nicely as possible, the assembly is indexed to the deck. The assembly is then glued to the deck using epoxy with filler.
After the assembly cures in the deck the ID is trimmed with a sharp chisel and sanded fair to the deck opening. The next step involves filling any voids with epoxy and filler and setting a small fillet around the inside corner of the wood ring and the walls of the riser so the glass and carbon will lay in nicely. Let it cure, sand it fair and lay in a layer of 4 oz glass, a layer of carbon, and another layer of glass to protect the carbon when the entire recess is sanded fair.
***** |
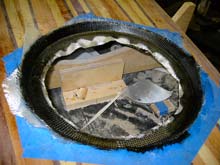
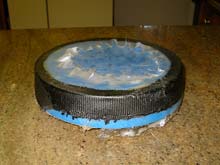 Here is the laid-up recess on the form. You cannot see that there is
a wood ring beneath the carbon lay-up. The wood ring ensures that
the plastic hatch ring that is part of the "Tupper Ware" style hatch
has a dead flat surface to sit on. After the form is taken off of the
lathe it is covered in masking tape and then covered with spray
glue. Sandwich wrap is then applied over the form and held in place
with the spray glue. The sandwich wrap serves as a release so the
laid-up hatch recess can be worked and pried off the form. This is
usually a little tough until it starts to give. This ring has 2
layers of 4 oz glass, then 4 layers of carbon, and then a layer of
glass. The carbon and glass were cut on a bias so they would easily
follow the shape of the form.
Here is the laid-up recess on the form. You cannot see that there is
a wood ring beneath the carbon lay-up. The wood ring ensures that
the plastic hatch ring that is part of the "Tupper Ware" style hatch
has a dead flat surface to sit on. After the form is taken off of the
lathe it is covered in masking tape and then covered with spray
glue. Sandwich wrap is then applied over the form and held in place
with the spray glue. The sandwich wrap serves as a release so the
laid-up hatch recess can be worked and pried off the form. This is
usually a little tough until it starts to give. This ring has 2
layers of 4 oz glass, then 4 layers of carbon, and then a layer of
glass. The carbon and glass were cut on a bias so they would easily
follow the shape of the form.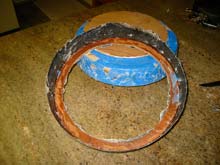
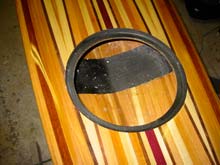
 This is a view of the front hatch recess from the underside of the
deck. The hole that was cut in the deck was done very carefully by
placing the recess on the deck after it was covered in masking tape
around the expected opening. A pencil held in a vertical position
was then traced around the recess, The pencil must be held vertical
so it projects a straight line down to the deck from the hatch
recess. I try to lay it out just a tiny bit under size and shape it
to fit so the fit is as snug as can be. Because the recess is
tapered it can be used with a sheet of 80 grit paper to sand the hole
in the deck so it perfectly conforms to the outside diameter of the
recess. That is, of course, if you cut the hole a tiny bit under
size. The recess is glued to the under side of the deck with epoxy
and filler. The top of the recess protrudes through the top of the
deck. It is carefully sanded flush with the deck so as not to scuff
the deck.
This is a view of the front hatch recess from the underside of the
deck. The hole that was cut in the deck was done very carefully by
placing the recess on the deck after it was covered in masking tape
around the expected opening. A pencil held in a vertical position
was then traced around the recess, The pencil must be held vertical
so it projects a straight line down to the deck from the hatch
recess. I try to lay it out just a tiny bit under size and shape it
to fit so the fit is as snug as can be. Because the recess is
tapered it can be used with a sheet of 80 grit paper to sand the hole
in the deck so it perfectly conforms to the outside diameter of the
recess. That is, of course, if you cut the hole a tiny bit under
size. The recess is glued to the under side of the deck with epoxy
and filler. The top of the recess protrudes through the top of the
deck. It is carefully sanded flush with the deck so as not to scuff
the deck.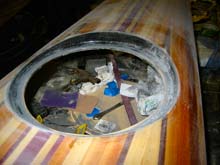
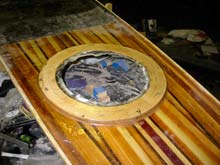 This rear hatch recess consists of a plywood ring and two ring arcs that are used to fill in the gap caused by the slight arch in the rear deck. Here is the completed ring assembly in the deck viewed from the under side of the deck.
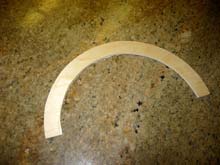
 |