
 Custom Search
|
|
| sails |
| plans |
| epoxy |
| rope/line |
| hardware |
| canoe/Kayak |
| sailmaking |
| materials |
| models |
| media |
| tools |
| gear |
 |
 |
| join |
| home |
| indexes |
| classifieds |
| calendar |
| archives |
| about |
| links |
| Join Duckworks Get free newsletter Comment on articles CLICK HERE |
|
|
| 50th Anniversary Boat Build - Part Two |
by Jeff Jouett - Houston, Texas - USA |
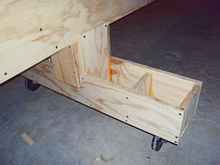
Part One - Part Two - Part Three One thing I’ve learned as I’ve gotten older is that even the best laid plans change. Since the first article was written, I had to make the tough decision that I would not be able to paddle in the 2012 Texas Water Safari. This decision was based on many factors with the primary one being that I’ll be getting married in July. The Safari is a month before our wedding day, so my priorities are to my wonderful Bride To Be and not the Texas rivers. Once I realized I wouldn’t be paddling in the event, my build pace slowed. There is a silver lining however regarding the Safari. I sold my C2 canoe to a tandem team from Austin, and I will be their team captain for the event. The boat build is being shifted towards the Colorado River 100 which will take place in September. In my last article I left it saying that I would follow up with the spacer blocks I made for the strongback. The blocks were made to just slide into place and self-lock over the legs.
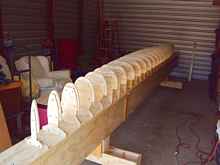
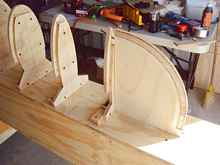
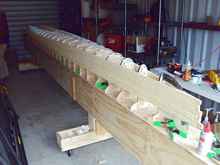
At this point the main legs barely overlapped the main beam which is all that was needed. They were screwed on to make sure they stayed in place, but they aren’t tight. I predrilled holes in the legs that were larger than the screws. This allowed the beam to “float” within the two legs so that all four wheels would always be touching the floor and not rock when moved around the floor. I’ve had too much experience with uneven shop floors over the years. At this point in the process it was time to start tackling the forms. Skip provided me with drawings of all the stations, and I also asked for a cad file. My daily life is CNC machining and I thought about machining all the forms, but opted to use the bandsaw and sander to make them. Everything was drawn out on the plywood and I began the process of making my stack of forms that would turn my 2d project into a 3d reality. Once installed on the strongback, a beautiful skeleton emerges.
The bow and stern profiles were machined on one of my mills. I wanted a feathered edge on each of them so this made it easy and extremely precise.
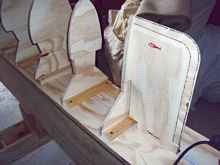
I was originally going to use some blue tape on the forms and then rub paste wax on the tape to prevent sticking. I happened to have some aluminum tape from another project, so I did a test of my glue on the tape and it proved to be a winner.
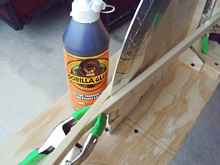
The core material for the hull is 3/8” Corecell purchased from: https://www.noahsboatbuilding.com/index.asp The sheets were 44” x 89” and I had them cut in half ahead of time to help with shipping costs leaving me with 44” x 45” panels. I ripped enough strips to get me well into the boat and started the process of stripping the hull. I’ve tried Gorilla Glue in the past and don’t really like it.
For this process however, it’s great because it foams up and fills in the gaps. For my starter rows, I glued pieces together to make two pieces over 19 feet long. The two starter pieces were stapled in place and then I began the gluing process using 4 foot strips. The glue requires moisture to work properly, so I would mist spray the strip on the forms, put glue on the piece to be added, and staple in place. Repeat many times.
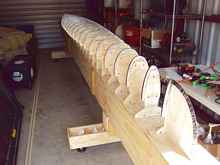
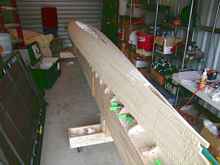
The shape of the hull dictated how I handled the strips. Once I reached the top of the bow forms, I skipped the very end and just kept going with the middle of the hull.
Foam shapes quickly and doesn’t have to be pretty since it sands so easily. Another milestone almost reached as there is only one small piece left to add.
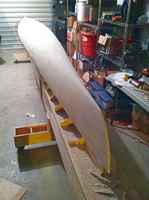
The roughing process began with a Surform Shaver and a very heavy grit (50) fairing board.
Once the boat was rough shaped, a 2 foot long fairing board with 80 grit paper was used to even everything out. There were some areas I wanted to fill though it probably wasn’t necessary. I purchased some Super Fil from Aircraft Spruce to try out, which is an ultra-lightweight filler that doesn’t get too hard once cured. I applied the filler to the areas of concern and sanded again with 80 grit.
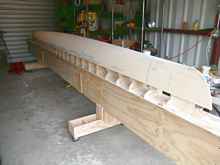
The boat has some tight tumblehome throughout the middle of the boat and I didn’t bead and cove or bevel any edges when stripping hull. The glue did foam up and fill in the gaps, but not as well as I had hoped, and these are the areas that required the most filling. A final sanding with 120 grit was done over the entire hull. Kevlar and fiberglass next. To be continued… |


 |